
Page 263 - Enhancing CAD Drawings with Photoshop
P. 263
4386.book Page 247 Monday, November 15, 2004 3:27 PM
APPLYING EFFECTS TO MASKED LAYERS 247
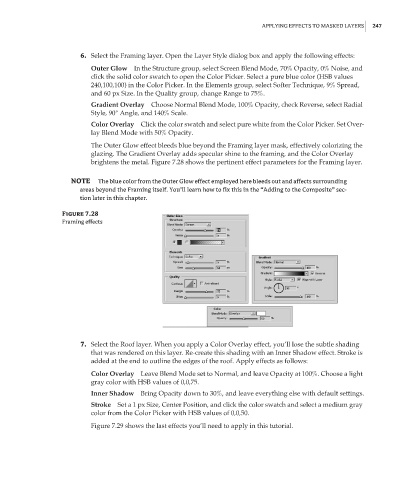
6. Select the Framing layer. Open the Layer Style dialog box and apply the following effects:
Outer Glow In the Structure group, select Screen Blend Mode, 70% Opacity, 0% Noise, and
click the solid color swatch to open the Color Picker. Select a pure blue color (HSB values
240,100,100) in the Color Picker. In the Elements group, select Softer Technique, 9% Spread,
and 60 px Size. In the Quality group, change Range to 75%.
Gradient Overlay Choose Normal Blend Mode, 100% Opacity, check Reverse, select Radial
Style, 90° Angle, and 140% Scale.
Color Overlay Click the color swatch and select pure white from the Color Picker. Set Over-
lay Blend Mode with 50% Opacity.
The Outer Glow effect bleeds blue beyond the Framing layer mask, effectively colorizing the
glazing. The Gradient Overlay adds specular shine to the framing, and the Color Overlay
brightens the metal. Figure 7.28 shows the pertinent effect parameters for the Framing layer.
NOTE The blue color from the Outer Glow effect employed here bleeds out and affects surrounding
areas beyond the Framing itself. You’ll learn how to fix this in the “Adding to the Composite” sec-
tion later in this chapter.
Figure 7.28
Framing effects
7. Select the Roof layer. When you apply a Color Overlay effect, you’ll lose the subtle shading
that was rendered on this layer. Re-create this shading with an Inner Shadow effect. Stroke is
added at the end to outline the edges of the roof. Apply effects as follows:
Color Overlay Leave Blend Mode set to Normal, and leave Opacity at 100%. Choose a light
gray color with HSB values of 0,0,75.
Inner Shadow Bring Opacity down to 30%, and leave everything else with default settings.
Stroke Set a 1 px Size, Center Position, and click the color swatch and select a medium gray
color from the Color Picker with HSB values of 0,0,50.
Figure 7.29 shows the last effects you’ll need to apply in this tutorial.