
Page 262 - Enhancing CAD Drawings with Photoshop
P. 262
4386.book Page 246 Monday, November 15, 2004 3:27 PM
246 CHAPTER 7 CREATIVE COMPOSITING
3. Select the Masonry layer. Open the Layer Style dialog box and apply the following effects:
Pattern Overlay Select Overlay Blend Mode, 22% Opacity, select the Concrete pattern from
the Texture Fill library, and set a 63% Scale.
Gradient Overlay Select Overlay Blend Mode, 35% Opacity, select the Black, White gradi-
ent, and uncheck Reverse, Linear Style, 125° Angle, and 150% Scale.
Color Overlay Select a pure yellow with HSB values of 60,100,100 in the Color Picker, set
Overlay Blend Mode, and 10% Opacity.
The same set of three effects is used on this layer as in the last step. This time Color Overlay is
used in a more traditional way to warm the masonry with a toned-down yellow hue. The Gra-
dient Overlay gives some shading to the wall surfaces. Pattern Overlay combines nicely with
the original subtle checkerboard texture that was rendered in VIZ.
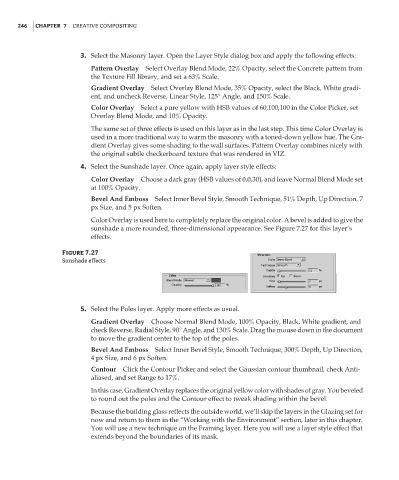
4. Select the Sunshade layer. Once again, apply layer style effects:
Color Overlay Choose a dark gray (HSB values of 0,0,30), and leave Normal Blend Mode set
at 100% Opacity.
Bevel And Emboss Select Inner Bevel Style, Smooth Technique, 51% Depth, Up Direction, 7
px Size, and 5 px Soften.
Color Overlay is used here to completely replace the original color. A bevel is added to give the
sunshade a more rounded, three-dimensional appearance. See Figure 7.27 for this layer’s
effects.
Figure 7.27
Sunshade effects
5. Select the Poles layer. Apply more effects as usual.
Gradient Overlay Choose Normal Blend Mode, 100% Opacity, Black, White gradient, and
check Reverse, Radial Style, 90° Angle, and 130% Scale. Drag the mouse down in the document
to move the gradient center to the top of the poles.
Bevel And Emboss Select Inner Bevel Style, Smooth Technique, 300% Depth, Up Direction,
4 px Size, and 6 px Soften.
Contour Click the Contour Picker and select the Gaussian contour thumbnail, check Anti-
aliased, and set Range to 17%.
In this case, Gradient Overlay replaces the original yellow color with shades of gray. You beveled
to round out the poles and the Contour effect to tweak shading within the bevel.
Because the building glass reflects the outside world, we’ll skip the layers in the Glazing set for
now and return to them in the “Working with the Environment” section, later in this chapter.
You will use a new technique on the Framing layer. Here you will use a layer style effect that
extends beyond the boundaries of its mask.