
Page 303 - Enhancing CAD Drawings with Photoshop
P. 303
4386.book Page 287 Monday, November 15, 2004 3:27 PM
WORKING IN BLACK AND WHITE 287
2. Make sure the top layer in the Layers palette is selected; in this case it is Fog. Click the Create
New Fill Or Adjustment Layer button at the bottom of the Layers palette to apply a Channel
Mixer adjustment layer.
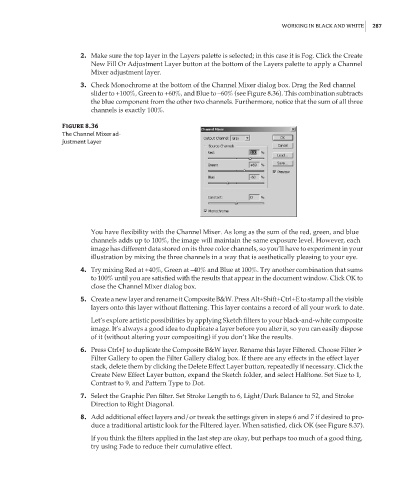
3. Check Monochrome at the bottom of the Channel Mixer dialog box. Drag the Red channel
slider to +100%, Green to +60%, and Blue to –60% (see Figure 8.36). This combination subtracts
the blue component from the other two channels. Furthermore, notice that the sum of all three
channels is exactly 100%.
Figure 8.36
The Channel Mixer ad-
justment Layer
You have flexibility with the Channel Mixer. As long as the sum of the red, green, and blue
channels adds up to 100%, the image will maintain the same exposure level. However, each
image has different data stored on its three color channels, so you’ll have to experiment in your
illustration by mixing the three channels in a way that is aesthetically pleasing to your eye.
4. Try mixing Red at +40%, Green at –40% and Blue at 100%. Try another combination that sums
to 100% until you are satisfied with the results that appear in the document window. Click OK to
close the Channel Mixer dialog box.
5. Create a new layer and rename it Composite B&W. Press Alt+Shift+Ctrl+E to stamp all the visible
layers onto this layer without flattening. This layer contains a record of all your work to date.
Let’s explore artistic possibilities by applying Sketch filters to your black-and-white composite
image. It’s always a good idea to duplicate a layer before you alter it, so you can easily dispose
of it (without altering your compositing) if you don’t like the results.
6. Press Ctrl+J to duplicate the Composite B&W layer. Rename this layer Filtered. Choose Filter
Filter Gallery to open the Filter Gallery dialog box. If there are any effects in the effect layer
stack, delete them by clicking the Delete Effect Layer button, repeatedly if necessary. Click the
Create New Effect Layer button, expand the Sketch folder, and select Halftone. Set Size to 1,
Contrast to 9, and Pattern Type to Dot.
7. Select the Graphic Pen filter. Set Stroke Length to 6, Light/Dark Balance to 52, and Stroke
Direction to Right Diagonal.
8. Add additional effect layers and/or tweak the settings given in steps 6 and 7 if desired to pro-
duce a traditional artistic look for the Filtered layer. When satisfied, click OK (see Figure 8.37).
If you think the filters applied in the last step are okay, but perhaps too much of a good thing,
try using Fade to reduce their cumulative effect.