
Page 313 - Enhancing CAD Drawings with Photoshop
P. 313
4386.book Page 297 Monday, November 15, 2004 3:27 PM
PRODUCING PRINTS 297
14. In the large Page Setup dialog box, click the Landscape radio button to set the print orientation.
Select a relevant paper size and source if necessary. (I’ll choose letter-sized paper and use the
sheet feeder.) Click OK to close the large Page Setup dialog box.
Remember that the image resolution set in step 5 was 256 pixels/inch. You have a little wiggle
room, so you can scale the image up slightly and still maintain an adequate resolution of at
least 200 pixels/inch.
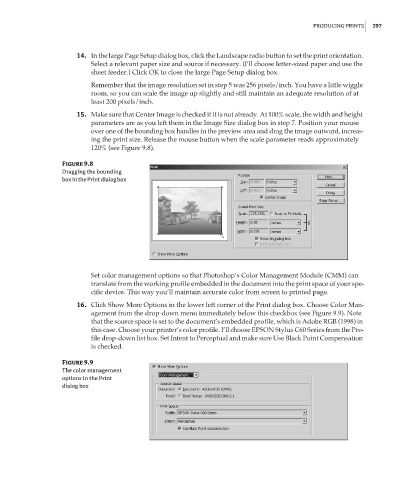
15. Make sure that Center Image is checked if it is not already. At 100% scale, the width and height
parameters are as you left them in the Image Size dialog box in step 7. Position your mouse
over one of the bounding box handles in the preview area and drag the image outward, increas-
ing the print size. Release the mouse button when the scale parameter reads approximately
120% (see Figure 9.8).
Figure 9.8
Dragging the bounding
box in the Print dialog box
Set color management options so that Photoshop’s Color Management Module (CMM) can
translate from the working profile embedded in the document into the print space of your spe-
cific device. This way you’ll maintain accurate color from screen to printed page.
16. Click Show More Options in the lower left corner of the Print dialog box. Choose Color Man-
agement from the drop-down menu immediately below this checkbox (see Figure 9.9). Note
that the source space is set to the document’s embedded profile, which is Adobe RGB (1998) in
this case. Choose your printer’s color profile. I’ll choose EPSON Stylus C60 Series from the Pro-
file drop-down list box. Set Intent to Perceptual and make sure Use Black Point Compensation
is checked.
Figure 9.9
The color management
options in the Print
dialog box