
Page 110 - Excel Timesaving Techniques for Dummies
P. 110
21_574272 ch18.qxd 10/1/04 10:29 PM Page 95
I personally favor the second method because it Merging Styles from One Book into Another 95
4.
Click OK to close the Style dialog box and com-
enables me to see how the new attributes for the plete the creation of your new style.
new style actually affect the appearance of typical
data in the sample cell before I create it. To see how After creating a new style, you can apply its format-
this works, follow along with the steps for creating a ting to a cell selection (single range or noncontigu-
new Title Style for instantly formatting the headings ous selection) in the worksheet by opening the Style
for tables of data in a new spreadsheet: dialog box (Format➪Style), selecting the name of the
style in the Style Name drop-down list box, and click-
1. Select a cell to use as the sample cell in a new ing OK. Of course, you can make applying a style a
workbook, make a typical data entry in it, and heck of a lot easier by adding a Style drop-down list
then manually format the cell with all the box to the Formatting toolbar. (See Technique 2 for
attributes you want the new style to assign. details on customizing Excel toolbars.)
To format the cell with the desired attributes,
use the buttons on the Formatting toolbar or the If you create a custom style that you rely on all
controls in the Format Cells dialog box (Ctrl+1). the time, consider assigning it to a button that
you add either to the Formatting toolbar or to
2. Choose Format➪Style to open the Style some custom toolbar. That way, you can format
dialog box. a cell selection with the style by clicking its
button. To do this, create a keystroke macro
3. Select the Style Name text box and replace that selects the custom style (see Technique
Normal with the unique name you want to give
60) and then assign this macro to a Custom
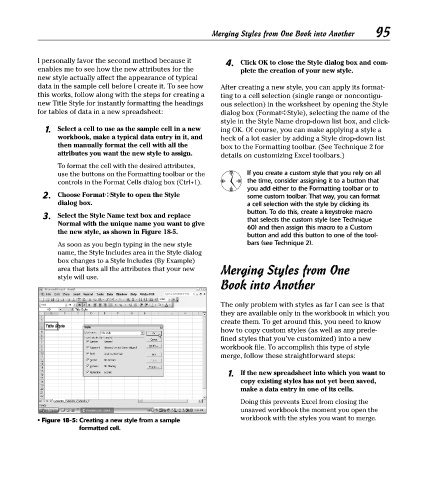
the new style, as shown in Figure 18-5.
button and add this button to one of the tool-
As soon as you begin typing in the new style bars (see Technique 2).
name, the Style Includes area in the Style dialog
box changes to a Style Includes (By Example)
area that lists all the attributes that your new Merging Styles from One
style will use.
Book into Another
The only problem with styles as far I can see is that
they are available only in the workbook in which you
create them. To get around this, you need to know
how to copy custom styles (as well as any prede-
fined styles that you’ve customized) into a new
workbook file. To accomplish this type of style
merge, follow these straightforward steps:
1. If the new spreadsheet into which you want to
copy existing styles has not yet been saved,
make a data entry in one of its cells.
Doing this prevents Excel from closing the
unsaved workbook the moment you open the
• Figure 18-5: Creating a new style from a sample workbook with the styles you want to merge.
formatted cell.