
Page 111 - Excel Timesaving Techniques for Dummies
P. 111
21_574272 ch18.qxd 10/1/04 10:29 PM Page 96
96
Technique 18: Style Formatting Magic
2. Open the existing workbook (Ctrl+O) contain- If the open workbook you selected contains mod-
ing the styles you want to use in your new ifications to the predefined styles (which also
spreadsheet. exist in the new workbook), an alert dialog box
appears asking you to confirm the merging of
3. Switch back to the blank workbook making this styles that have the same names.
spreadsheet active.
7. If the confirmation alert dialog box appears,
You can do this either by clicking its button on click Yes to have the predefined styles in the
the Windows taskbar or by selecting it at the bot- active workbook overwritten or No to prevent
tom of the Window pull-down menu. them from being copied into the new work-
4. Choose Format➪Style to open the Style book. If this confirmation dialog box does not
dialog box. appear, click OK in the Merge Styles dialog box
to close it.
5. Click the Merge button near the bottom of the
Style dialog box to open the Merge Styles dia- 8. Click OK in the Style dialog box to close it and
return to the active spreadsheet.
log box.
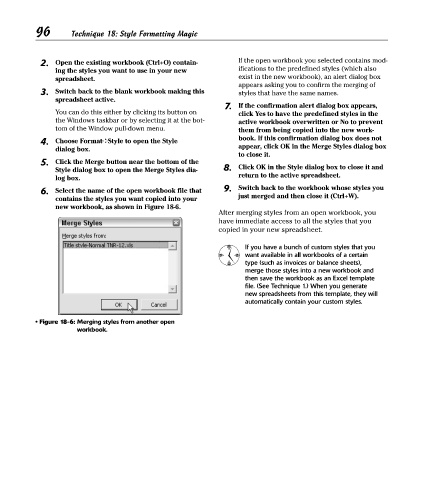
6. Select the name of the open workbook file that 9. Switch back to the workbook whose styles you
contains the styles you want copied into your just merged and then close it (Ctrl+W).
new workbook, as shown in Figure 18-6.
After merging styles from an open workbook, you
have immediate access to all the styles that you
copied in your new spreadsheet.
If you have a bunch of custom styles that you
want available in all workbooks of a certain
type (such as invoices or balance sheets),
merge those styles into a new workbook and
then save the workbook as an Excel template
file. (See Technique 1.) When you generate
new spreadsheets from this template, they will
automatically contain your custom styles.
• Figure 18-6: Merging styles from another open
workbook.