
Page 144 - How To Implement Lean Manufacturing
P. 144
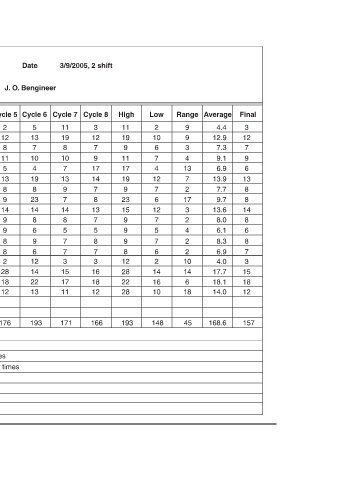
Final  3  12  7  9  6  13  8  8  14  8  6  8  7  3  15  18  12  157

                        Average  4.4  12.9  7.3  9.1  6.9  13.9  7.7  9.7  13.6  8.0  6.1  8.3  6.9  4.0  17.7  18.1  14.0  168.6


                        Range  9  9  3  4  13  7  2  17  3  2  4  2  2  10  14  6  18  45


                        Low  2  10  6  7  4  12  7  6  12  7  5  7  6  2  14  16  10  148


                        High  11  19  9  11  17  19  9  23  15  9  9  9  8  12  28  22  28  193
              3/9/2005, 2 shift  Cycle 8 Cycle 7  3  11  12  19  7  8  9  10  17  7  14  13  7  9  8  7  13  14  7  8  5  5  8  7  7  7  3  3  16  15  18  17  12  11  166  171


                   J. O. Bengineer  Cycle 6  5  13  7  10  4  19  8  23  14  8  6  9  6  12  14  22  13  193

              Date      Cycle 5  2  12  8  11  5  13  8  9  14  9  9  8  8  2  28  18  12  176


                        Cycle 3  3  13  6  9  6  12  7  8  15  9  5  9  7  3  15  17  28  172

              Rayco 43-27  Done by:  Cycle 2  Cycle 1  4  3  10  11  6  9  8  7  5  4  12  14  8  7  7  6  13  12  8  7  6  7  8  9  7  6  3  2  14  22  19  16  10  12  148  154


                        Work Element  Insert o-rings, cap, grease  Install o-ring and clip (2) Apply epoxy, 3 locations  Install control capacitor  Unload/load machine (2)  Gun required unplugging hence long times, place on PM program Long cycle time was due to dropped parts, attention to details Long cycle times were due to dropped parts, operator needs surgical gloves


                   Zeta Cell  Cut bracket  Assy bushing (3)  Install o-ring and clip  Place in jig, glue  Press in magnets (2)  Install support  Apply epoxy, topside  Install retainer ring  Install covercap  Apply final sealant (1)  Final test, wrap leads  Package  Total  Numerous units dropped on the floor Transportation times not taken  Zeta cell time study.


              Process to Monitor  Station:   FC Id. Step No  10  1  20  2  30  3  40  4  50  5  60  6  70  7  80  8  90  9  100  10  110  11  120  12  130  13  140  14  150  15  160  16  200  17  18  19  20  Notes 1  2  3  4  5  6  7  8  FIGURE 7-1


         122