
Page 365 - Robot Builder's Bonanza
P. 365
334 BUILD ROBOTS WITH LEGS
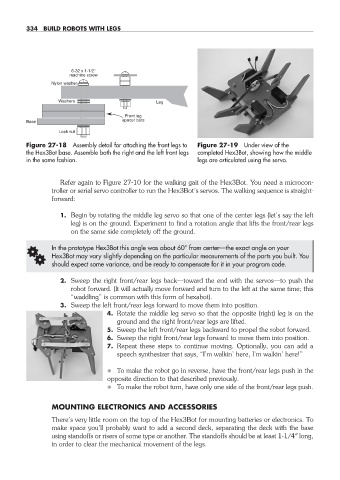
6-32 x 1-1/2"
machine screw
Nylon washer
Washers Leg
Front leg
spacer bars
Base
Lock nut
Figure 27- 18 Assembly detail for attaching the front legs to Figure 27- 19 Under view of the
the Hex3Bot base. Assemble both the right and the left front legs completed Hex3Bot, showing how the middle
in the same fashion. legs are articulated using the servo.
Refer again to Figure 27- 10 for the walking gait of the Hex3Bot. You need a microcon-
troller or serial servo controller to run the Hex3Bot’s servos. The walking sequence is straight-
forward:
1. Begin by rotating the middle leg servo so that one of the center legs (let’s say the left
leg) is on the ground. Experiment to find a rotation angle that lifts the front/rear legs
on the same side completely off the ground.
G In the prototype Hex3Bot this angle was about 60° from center— the exact angle on your
Hex3Bot may vary slightly depending on the particular measurements of the parts you built. You
should expect some variance, and be ready to compensate for it in your program code.
2. Sweep the right front/rear legs back— toward the end with the servos— to push the
robot forward. (It will actually move forward and turn to the left at the same time; this
“waddling” is common with this form of hexabot).
3. Sweep the left front/rear legs forward to move them into position.
4. Rotate the middle leg servo so that the opposite (right) leg is on the
ground and the right front/rear legs are lifted.
5. Sweep the left front/rear legs backward to propel the robot forward.
6. Sweep the right front/rear legs forward to move them into position.
7. Repeat these steps to continue moving. Optionally, you can add a
speech synthesizer that says, “I’m walkin’ here, I’m walkin’ here!”
• To make the robot go in reverse, have the front/rear legs push in the
opposite direction to that described previously.
• To make the robot turn, have only one side of the front/rear legs push.
MOUNTING ELECTRONICS AND ACCESSORIES
There’s very little room on the top of the Hex3Bot for mounting batteries or electronics. To
make space you’ll probably want to add a second deck, separating the deck with the base
using standoffs or risers of some type or another. The standoffs should be at least 1- 1/4″ long,
in order to clear the mechanical movement of the legs.
27-chapter-27.indd 334 4/21/11 11:52 AM