
Page 386 - Robot Builder's Bonanza
P. 386
TOOL CLAMP GRIPPER 355
Figure 29- 6 A commercially available plastic
two- pincher robot arm and claw toy. The gripper can
be salvaged for use in your own designs.
Figure 29- 5 The finished two- pincher gripper, with
fingertip pads and actuating cables.
You can now use the dowel to mount the gripper on an arm assembly. You can use a small
3/4″ U- bolt or flatten one end of the dowel and attach it directly to the arm. The gripper
opens and closes with only a 1/2″ pull. Attach the end of the cable to a clevis (available at
hobby stores), then connect that to a servo horn (Figure 29- 8).
CONSTRUCTING PARALLEL FINGER GRIPPERS
Figures 29- 9 through 29- 12 show another approach to constructing two- pincher grippers. By
adding a second rail to the fingers and allowing a pivot for both, the fingertips remain parallel
to one another as the fingers open and close. You can employ several actuation techniques
with such a gripper. Only basic plans are provided here to give you an idea of how these grip-
pers work. Feel free to experiment to come up with unique designs of your own.
Tool Clamp Gripper
I figure if someone else has gone to the trouble and expense of making a product that just
happens to work in robot projects, the least we can do is take advantage of their kindness!
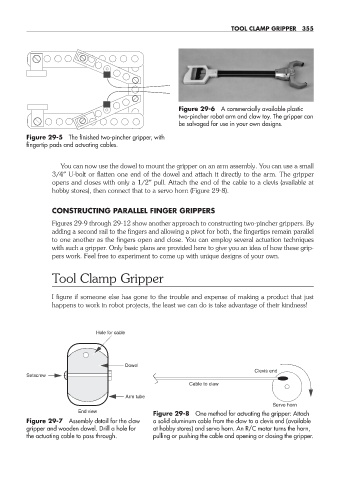
Hole for cable
Dowel
Clevis end
Setscrew
Cable to claw
Arm tube
Servo horn
End view Figure 29- 8 One method for actuating the gripper: Attach
Figure 29- 7 Assembly detail for the claw a solid aluminum cable from the claw to a clevis end (available
gripper and wooden dowel. Drill a hole for at hobby stores) and servo horn. An R/C motor turns the horn,
the actuating cable to pass through. pulling or pushing the cable and opening or closing the gripper.
29-chapter-29.indd 355 4/21/11 11:53 AM