
Page 387 - Robot Builder's Bonanza
P. 387
356 EXPERIMENTING WITH ROBOTIC GRIPPERS
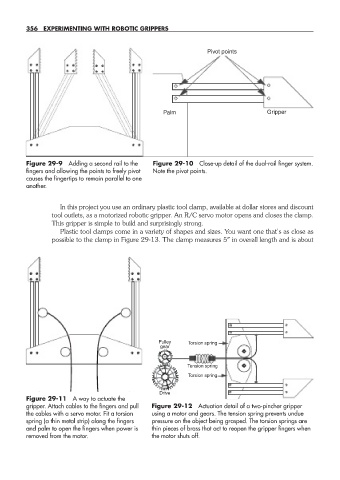
Pivot points
Palm Gripper
Figure 29- 9 Adding a second rail to the Figure 29- 10 Close- up detail of the dual- rail finger system.
fingers and allowing the points to freely pivot Note the pivot points.
causes the fingertips to remain parallel to one
another.
In this project you use an ordinary plastic tool clamp, available at dollar stores and discount
tool outlets, as a motorized robotic gripper. An R/C servo motor opens and closes the clamp.
This gripper is simple to build and surprisingly strong.
Plastic tool clamps come in a variety of shapes and sizes. You want one that’s as close as
possible to the clamp in Figure 29- 13. The clamp measures 5″ in overall length and is about
Pulley Torsion spring
gear
Tension spring
Torsion spring
Drive
Figure 29- 11 A way to actuate the
gripper. Attach cables to the fingers and pull Figure 29- 12 Actuation detail of a two- pincher gripper
the cables with a servo motor. Fit a torsion using a motor and gears. The tension spring prevents undue
spring (a thin metal strip) along the fingers pressure on the object being grasped. The torsion springs are
and palm to open the fingers when power is thin pieces of brass that act to reopen the gripper fingers when
removed from the motor. the motor shuts off.
29-chapter-29.indd 356 4/21/11 11:53 AM