Page 115 - Six Sigma for electronics design and manufacturing
P. 115
Six Sigma for Electronics Design and Manufacturing
                     84
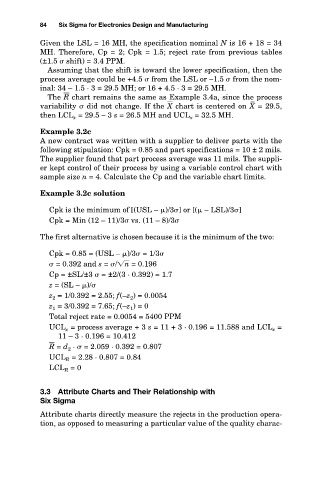
                     Given the LSL = 16 MH, the specification nominal N is 16 + 18 = 34
                     MH. Therefore, Cp = 2; Cpk = 1.5; reject rate from previous tables
                     (±1.5   shift) = 3.4 PPM.
                       Assuming that the shift is toward the lower specification, then the
                     process average could be +4.5   from the LSL or –1.5   from the nom-
                     inal: 34 – 1.5 · 3 = 29.5 MH; or 16 + 4.5 · 3 = 29.5 MH.
                       The R   chart remains the same as Example 3.4a, since the process
                     variability   did not change. If the X   chart is centered on X = 29.5,
                     then LCL x = 29.5 – 3 s = 26.5 MH and UCL x = 32.5 MH.
                     Example 3.2c                                       – –
                     A new contract was written with a supplier to deliver parts with the
                     following stipulation: Cpk = 0.85 and part specifications = 10 ± 2 mils.
                     The supplier found that part process average was 11 mils. The suppli-
                     er kept control of their process by using a variable control chart with
                     sample size n = 4. Calculate the Cp and the variable chart limits.
                     Example 3.2c solution
                        Cpk is the minimum of [(USL –  )/3 ] or [(  – LSL)/3 ]
                        Cpk = Min (12 – 11)/3  vs. (11 – 8)/3
                     The first alternative is chosen because it is the minimum of the two:
                        Cpk = 0.85 = (USL –  )/3  = 1/3
                          = 0.392 and s =  / n  = 0.196
                        Cp = ±SL/±3   = ±2/(3 · 0.392) = 1.7
                        z = (SL –  )/
                        z 2 = 1/0.392 = 2.55; f(–z 2 ) = 0.0054
                        z 1 = 3/0.392 = 7.65; f(–z 1 ) = 0
                        Total reject rate = 0.0054 = 5400 PPM
                        UCL x = process average + 3 s = 11 + 3 · 0.196 = 11.588 and LCL x =
                          11 – 3 · 0.196 = 10.412
                        R   = d 2 ·   = 2.059 · 0.392 = 0.807
                        UCL R = 2.28 · 0.807 = 0.84
                        LCL R = 0

                     3.3  Attribute Charts and Their Relationship with
                     Six Sigma
                     Attribute charts directly measure the rejects in the production opera-
                     tion, as opposed to measuring a particular value of the quality charac-

