
Page 174 - Statistics II for Dummies
P. 174
158
Part III: Analyzing Variance with ANOVA
Verifying independence
To check the first condition, examine how the data were collected from
each of the separate populations. In order to maintain independence, the
outcomes from one population can’t affect the outcomes of the other popu-
lations. If the data have been collected by using a separate random sample
from each population (random here meaning that each individual in the popu-
lation had an equal chance of being selected), this factor ensures indepen-
dence at the strongest level.
In the watermelon seed-spitting data (see Table 9-1), the data aren’t randomly
sampled from each age group because the data represent everyone who par-
ticipated in the contest. But, you can argue that in most cases the seed-spitting
distances from one age group don’t affect the seed-spitting distances from the
other age groups, so the independence assumption is relatively okay.
Looking for what’s normal
The second ANOVA condition is that each of the k populations has a normal
distribution. To check this condition, make a separate histogram of the data
from each group and see whether it resembles a normal distribution. Data
from a normal distribution should look symmetric (in other words, if you
split the histogram down the middle, it looks the same on each side) and
have a bell shape. Don’t expect the data in each histogram to follow a normal
distribution exactly (remember, it’s only a sample), but it shouldn’t be
extremely different from a normal, bell-shaped distribution.
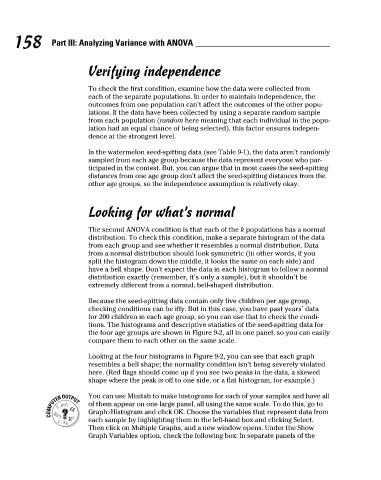
Because the seed-spitting data contain only five children per age group,
checking conditions can be iffy. But in this case, you have past years’ data
for 200 children in each age group, so you can use that to check the condi-
tions. The histograms and descriptive statistics of the seed-spitting data for
the four age groups are shown in Figure 9-2, all in one panel, so you can easily
compare them to each other on the same scale.
Looking at the four histograms in Figure 9-2, you can see that each graph
resembles a bell shape; the normality condition isn’t being severely violated
here. (Red flags should come up if you see two peaks in the data, a skewed
shape where the peak is off to one side, or a flat histogram, for example.)
You can use Minitab to make histograms for each of your samples and have all
of them appear on one large panel, all using the same scale. To do this, go to
Graph>Histogram and click OK. Choose the variables that represent data from
each sample by highlighting them in the left-hand box and clicking Select.
Then click on Multiple Graphs, and a new window opens. Under the Show
Graph Variables option, check the following box: In separate panels of the
7/23/09 9:31:28 PM
15_466469-ch09.indd 158 7/23/09 9:31:28 PM
15_466469-ch09.indd 158