Page 136 - Wire Bonding in Microelectronics
P. 136
114 Cha pte r F o u r
unless the wire diameter is less than or equal to 25 µm. See Levine
[4-45] for a concise discussion of fine pitch and ribbon testing.
The greatest use of the shear test on wedge-wedge bonds takes
place on large-diameter Al wire wedge bonds, such as are used in
power devices. These are usually made with parallel, V-grooved tools
and stand relatively high. Such bonds can be successfully evaluated
with a shear tester. For example, if a 250 µm (10 mil) diameter Al wire
is deformed 20% (at the interface) and has a foot length of 750 µm
(30 mil), then the shear force will be approximately 1.6 kgf (3.5 lbf) if
the interface was fully welded. ∗ A well-bonded Al wedge bond from
large wire [diameter ≥ 100 µm (≥4 mil)] on a power device should
yield a shear force value on the order of 2 to 4 times the pull force
value (depending on the length of the bond), thus greatly increasing
the sensitivity for bonding machine setup purposes. A shear strength
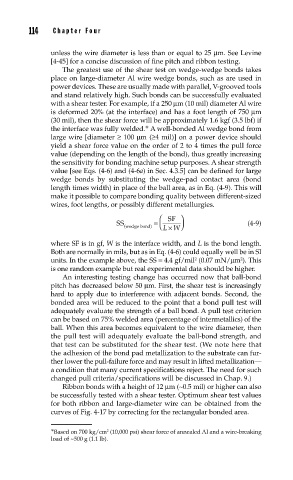
value [see Eqs. (4-6) and (4-6a) in Sec. 4.3.5] can be defined for large
wedge bonds by substituting the wedge-pad contact area (bond
length times width) in place of the ball area, as in Eq. (4-9). This will
make it possible to compare bonding quality between different-sized
wires, foot lengths, or possibly different metallurgies.
SF
SS (wedge bond) = LW (4-9)
×
where SF is in gf, W is the interface width, and L is the bond length.
Both are normally in mils, but as in Eq. (4-6) could equally well be in SI
units. In the example above, the SS = 4.4 gf/mil (0.07 mN/µm ). This
2
2
is one random example but real experimental data should be higher.
An interesting testing change has occurred now that ball-bond
pitch has decreased below 50 µm. First, the shear test is increasingly
hard to apply due to interference with adjacent bonds. Second, the
bonded area will be reduced to the point that a bond pull test will
adequately evaluate the strength of a ball bond. A pull test criterion
can be based on 75% welded area (percentage of intermetallics) of the
ball. When this area becomes equivalent to the wire diameter, then
the pull test will adequately evaluate the ball-bond strength, and
that test can be substituted for the shear test. (We note here that
the adhesion of the bond pad metallization to the substrate can fur-
ther lower the pull-failure force and may result in lifted metallization—
a condition that many current specifications reject. The need for such
changed pull criteria/specifications will be discussed in Chap. 9.)
Ribbon bonds with a height of 12 µm (∼0.5 mil) or higher can also
be successfully tested with a shear tester. Optimum shear test values
for both ribbon and large-diameter wire can be obtained from the
curves of Fig. 4-17 by correcting for the rectangular bonded area.
∗ Based on 700 kg/cm (10,000 psi) shear force of annealed Al and a wire-breaking
2
load of ~500 g (1.1 lb).

