
Page 72 - 15 Dangerously Mad Projects for the Evil Genius
P. 72
Chapter 5 ■ Balloon-Popping Laser Gun 51
from hardware stores. The components could just
as easily have been used on a strip of plastic or
even built into a toy gun.
The battery clip terminals fit through holes
made in the aluminum so that when a PP3 battery
is attached, it forms the handle of the gun.
The resistor limits the current to the laser diode
module. Resist the temptation to buy just a laser
diode; instead, look for a laser diode module. The
difference is that the “laser diode” will not have a
Figure 5-2 The ray gun
lens, so you will not get the tight beam of a laser.
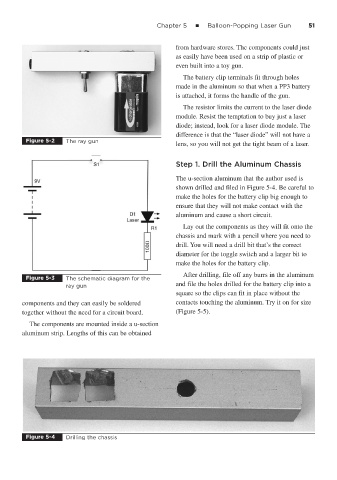
Step 1. Drill the Aluminum Chassis
The u-section aluminum that the author used is
shown drilled and filed in Figure 5-4. Be careful to
make the holes for the battery clip big enough to
ensure that they will not make contact with the
aluminum and cause a short circuit.
Lay out the components as they will fit onto the
chassis and mark with a pencil where you need to
drill. You will need a drill bit that’s the correct
diameter for the toggle switch and a larger bit to
make the holes for the battery clip.
After drilling, file off any burrs in the aluminum
Figure 5-3 The schematic diagram for the
ray gun and file the holes drilled for the battery clip into a
square so the clips can fit in place without the
components and they can easily be soldered contacts touching the aluminum. Try it on for size
together without the need for a circuit board. (Figure 5-5).
The components are mounted inside a u-section
aluminum strip. Lengths of this can be obtained
Figure 5-4 Drilling the chassis