
Page 73 - 15 Dangerously Mad Projects for the Evil Genius
P. 73
52 15 Dangerously Mad Projects for the Evil Genius
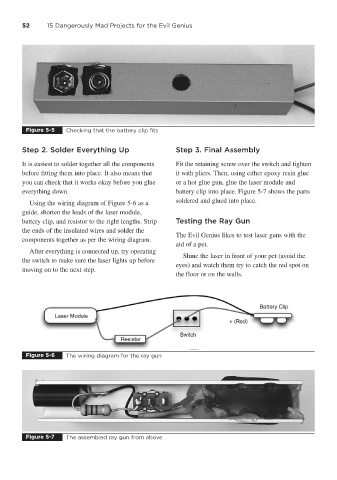
Figure 5-5 Checking that the battery clip fits
Step 2. Solder Everything Up Step 3. Final Assembly
It is easiest to solder together all the components Fit the retaining screw over the switch and tighten
before fitting them into place. It also means that it with pliers. Then, using either epoxy resin glue
you can check that it works okay before you glue or a hot glue gun, glue the laser module and
everything down. battery clip into place. Figure 5-7 shows the parts
soldered and glued into place.
Using the wiring diagram of Figure 5-6 as a
guide, shorten the leads of the laser module,
battery clip, and resistor to the right lengths. Strip Testing the Ray Gun
the ends of the insulated wires and solder the
The Evil Genius likes to test laser guns with the
components together as per the wiring diagram.
aid of a pet.
After everything is connected up, try operating
Shine the laser in front of your pet (avoid the
the switch to make sure the laser lights up before
eyes) and watch them try to catch the red spot on
moving on to the next step.
the floor or on the walls.
Figure 5-6 The wiring diagram for the ray gun
Figure 5-7 The assembled ray gun from above