
Page 100 - Enhancing CAD Drawings with Photoshop
P. 100
4386.book Page 83 Monday, November 15, 2004 3:27 PM
BALANCING COLOR 83
In some cases, you might want to intentionally change the mood of an image by shifting its color
balance slightly. A bright sunny day might seem psychologically warmer if the image has an orange
cast. Color influences emotions, and people’s perceptions can be shifted with careful color balancing.
1. Continue from where you left off in the last section, or open the file SidewalkWorking.psd
from the CD.
2. The primary tool for color balancing images that have easily identified neutral tones is Curves.
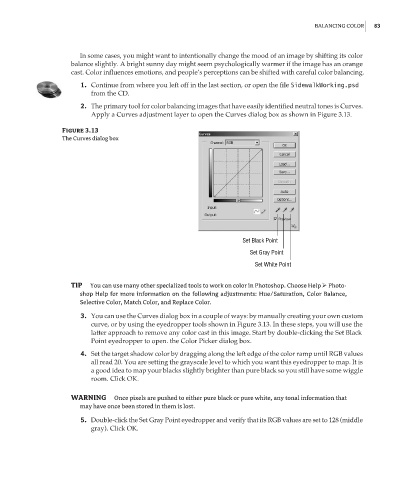
Apply a Curves adjustment layer to open the Curves dialog box as shown in Figure 3.13.
Figure 3.13
The Curves dialog box
Set Black Point
Set Gray Point
Set White Point
TIP You can use many other specialized tools to work on color in Photoshop. Choose Help Photo-
shop Help for more information on the following adjustments: Hue/Saturation, Color Balance,
Selective Color, Match Color, and Replace Color.
3. You can use the Curves dialog box in a couple of ways: by manually creating your own custom
curve, or by using the eyedropper tools shown in Figure 3.13. In these steps, you will use the
latter approach to remove any color cast in this image. Start by double-clicking the Set Black
Point eyedropper to open. the Color Picker dialog box.
4. Set the target shadow color by dragging along the left edge of the color ramp until RGB values
all read 20. You are setting the grayscale level to which you want this eyedropper to map. It is
a good idea to map your blacks slightly brighter than pure black so you still have some wiggle
room. Click OK.
WARNING Once pixels are pushed to either pure black or pure white, any tonal information that
may have once been stored in them is lost.
5. Double-click the Set Gray Point eyedropper and verify that its RGB values are set to 128 (middle
gray). Click OK.