
Page 99 - Enhancing CAD Drawings with Photoshop
P. 99
4386.book Page 82 Monday, November 15, 2004 3:27 PM
82 CHAPTER 3 DIGITAL DARKROOM SKILLS
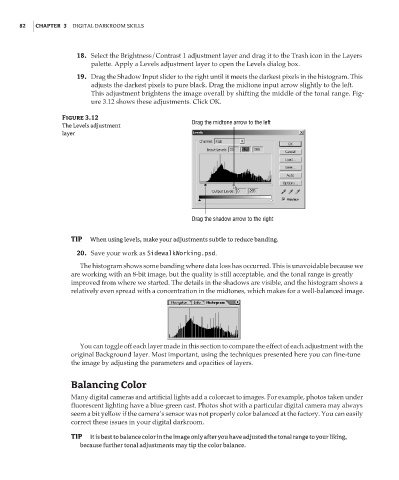
18. Select the Brightness/Contrast 1 adjustment layer and drag it to the Trash icon in the Layers
palette. Apply a Levels adjustment layer to open the Levels dialog box.
19. Drag the Shadow Input slider to the right until it meets the darkest pixels in the histogram. This
adjusts the darkest pixels to pure black. Drag the midtone input arrow slightly to the left.
This adjustment brightens the image overall by shifting the middle of the tonal range. Fig-
ure 3.12 shows these adjustments. Click OK.
Figure 3.12
Drag the midtone arrow to the left
The Levels adjustment
layer
Drag the shadow arrow to the right
TIP When using levels, make your adjustments subtle to reduce banding.
20. Save your work as SidewalkWorking.psd.
The histogram shows some banding where data loss has occurred. This is unavoidable because we
are working with an 8-bit image, but the quality is still acceptable, and the tonal range is greatly
improved from where we started. The details in the shadows are visible, and the histogram shows a
relatively even spread with a concentration in the midtones, which makes for a well-balanced image.
You can toggle off each layer made in this section to compare the effect of each adjustment with the
original Background layer. Most important, using the techniques presented here you can fine-tune
the image by adjusting the parameters and opacities of layers.
Balancing Color
Many digital cameras and artificial lights add a colorcast to images. For example, photos taken under
fluorescent lighting have a blue-green cast. Photos shot with a particular digital camera may always
seem a bit yellow if the camera’s sensor was not properly color balanced at the factory. You can easily
correct these issues in your digital darkroom.
TIP It is best to balance color in the image only after you have adjusted the tonal range to your liking,
because further tonal adjustments may tip the color balance.