
Page 98 - Enhancing CAD Drawings with Photoshop
P. 98
4386.book Page 81 Monday, November 15, 2004 3:27 PM
ADJUSTING TONAL RANGE 81
You will have to experiment with the Shadow/Highlight parameters on each image you
adjust, and getting real-time visual feedback as you drag the sliders makes it easy. As you can
see, Shadow/Highlight is like Brightness/Contrast on steroids because you can focus its
effects right where you want them within the tonal range.
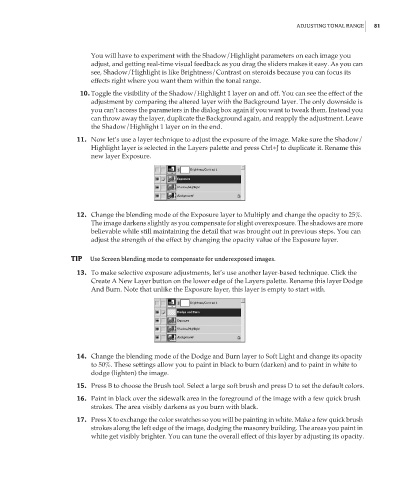
10. Toggle the visibility of the Shadow/Highlight 1 layer on and off. You can see the effect of the
adjustment by comparing the altered layer with the Background layer. The only downside is
you can’t access the parameters in the dialog box again if you want to tweak them. Instead you
can throw away the layer, duplicate the Background again, and reapply the adjustment. Leave
the Shadow/Highlight 1 layer on in the end.
11. Now let’s use a layer technique to adjust the exposure of the image. Make sure the Shadow/
Highlight layer is selected in the Layers palette and press Ctrl+J to duplicate it. Rename this
new layer Exposure.
12. Change the blending mode of the Exposure layer to Multiply and change the opacity to 25%.
The image darkens slightly as you compensate for slight overexposure. The shadows are more
believable while still maintaining the detail that was brought out in previous steps. You can
adjust the strength of the effect by changing the opacity value of the Exposure layer.
TIP Use Screen blending mode to compensate for underexposed images.
13. To make selective exposure adjustments, let’s use another layer-based technique. Click the
Create A New Layer button on the lower edge of the Layers palette. Rename this layer Dodge
And Burn. Note that unlike the Exposure layer, this layer is empty to start with.
14. Change the blending mode of the Dodge and Burn layer to Soft Light and change its opacity
to 50%. These settings allow you to paint in black to burn (darken) and to paint in white to
dodge (lighten) the image.
15. Press B to choose the Brush tool. Select a large soft brush and press D to set the default colors.
16. Paint in black over the sidewalk area in the foreground of the image with a few quick brush
strokes. The area visibly darkens as you burn with black.
17. Press X to exchange the color swatches so you will be painting in white. Make a few quick brush
strokes along the left edge of the image, dodging the masonry building. The areas you paint in
white get visibly brighter. You can tune the overall effect of this layer by adjusting its opacity.