
Page 93 - Enhancing CAD Drawings with Photoshop
P. 93
4386.book Page 76 Monday, November 15, 2004 3:27 PM
76 CHAPTER 3 DIGITAL DARKROOM SKILLS
TIP It is a good idea to periodically check Adobe’s website for free updates to Photoshop.
2. Follow the download instructions given in the .pdf file that accompanies the plug-in. You will
be required to move two files and restart Photoshop.
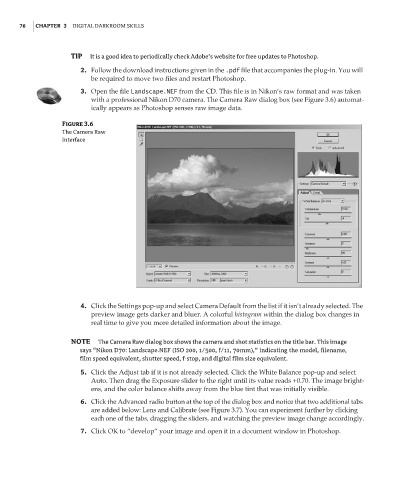
3. Open the file Landscape.NEF from the CD. This file is in Nikon’s raw format and was taken
with a professional Nikon D70 camera. The Camera Raw dialog box (see Figure 3.6) automat-
ically appears as Photoshop senses raw image data.
Figure 3.6
The Camera Raw
Interface
4. Click the Settings pop-up and select Camera Default from the list if it isn’t already selected. The
preview image gets darker and bluer. A colorful histogram within the dialog box changes in
real time to give you more detailed information about the image.
NOTE The Camera Raw dialog box shows the camera and shot statistics on the title bar. This image
says “Nikon D70: Landscape.NEF (ISO 200, 1/500, f/11, 70mm),” indicating the model, filename,
film speed equivalent, shutter speed, f-stop, and digital film size equivalent.
5. Click the Adjust tab if it is not already selected. Click the White Balance pop-up and select
Auto. Then drag the Exposure slider to the right until its value reads +0.70. The image bright-
ens, and the color balance shifts away from the blue tint that was initially visible.
6. Click the Advanced radio button at the top of the dialog box and notice that two additional tabs
are added below: Lens and Calibrate (see Figure 3.7). You can experiment further by clicking
each one of the tabs, dragging the sliders, and watching the preview image change accordingly.
7. Click OK to “develop” your image and open it in a document window in Photoshop.