
Page 227 - Enhancing CAD Drawings with Photoshop
P. 227
4386.book Page 211 Monday, November 15, 2004 3:27 PM
FAKING REFLECTION AND REFRACTION 211
Faking Reflection and Refraction
Building windows reflect the world around them and bend light as it passes through (refraction). A
3D program such as Autodesk VIZ can accurately calculate reflection and refraction of the surround-
ing environment using a time-consuming rendering process called raytracing.
Fortunately, you don’t have to wait long in Photoshop because you can reasonably fake these opti-
cal phenomena by pasting photographic images into the glazed surfaces of the image. In this section,
you’ll learn techniques for making windows more realistic by varying the lighting intensity with a
paint brush. We’ll use liquify and warp techniques in reflected images to slightly hint at refraction
that takes place in the real world.
Although reflection and refraction aren’t as accurate in Photoshop as in a complete 3D model, you’ll
find that you can get reasonable quality in a short time. These faked techniques effectively convey the
idea of glazing and still reflect a bit of a building site’s context to the viewer.
I’m taking you through these steps because this is something that will most likely happen in a real
project. You have spent a lot of time working on your elevation in Photoshop, only to discover that
you need some additional line work from CAD. Or worse yet, the design has changed again at the last
minute! You don’t have to start over or worry once you see how easy it is to reimport additional image
layers and integrate them into your project.
1. Before you dive in, you need to import a hidden layer from the original CAD file. Launch
AutoCAD, and open the file Elevation.dwg from the companion CD.
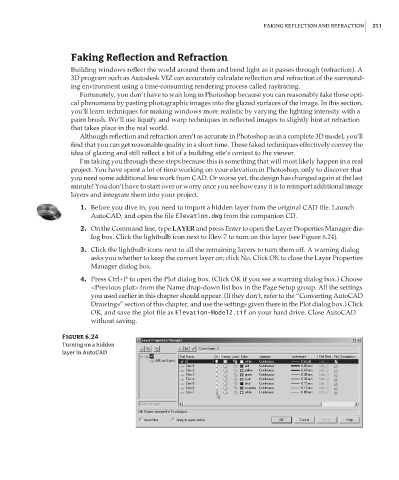
2. On the Command line, type LAYER and press Enter to open the Layer Properties Manager dia-
log box. Click the lightbulb icon next to Elev-7 to turn on this layer (see Figure 6.24).
3. Click the lightbulb icons next to all the remaining layers to turn them off. A warning dialog
asks you whether to keep the current layer on; click No. Click OK to close the Layer Properties
Manager dialog box.
4. Press Ctrl+P to open the Plot dialog box. (Click OK if you see a warning dialog box.) Choose
<Previous plot> from the Name drop-down list box in the Page Setup group. All the settings
you used earlier in this chapter should appear. (If they don’t, refer to the “Converting AutoCAD
Drawings” section of this chapter, and use the settings given there in the Plot dialog box.) Click
OK, and save the plot file as Elevation-Model2.tif on your hard drive. Close AutoCAD
without saving.
Figure 6.24
Turning on a hidden
layer in AutoCAD