
Page 45 - Enhancing CAD Drawings with Photoshop
P. 45
4386.book Page 28 Monday, November 15, 2004 3:27 PM
28 CHAPTER 1 THE BASICS
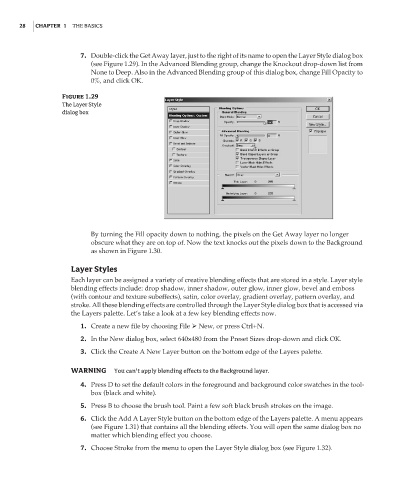
7. Double-click the Get Away layer, just to the right of its name to open the Layer Style dialog box
(see Figure 1.29). In the Advanced Blending group, change the Knockout drop-down list from
None to Deep. Also in the Advanced Blending group of this dialog box, change Fill Opacity to
0%, and click OK.
Figure 1.29
The Layer Style
dialog box
By turning the Fill opacity down to nothing, the pixels on the Get Away layer no longer
obscure what they are on top of. Now the text knocks out the pixels down to the Background
as shown in Figure 1.30.
Layer Styles
Each layer can be assigned a variety of creative blending effects that are stored in a style. Layer style
blending effects include: drop shadow, inner shadow, outer glow, inner glow, bevel and emboss
(with contour and texture subeffects), satin, color overlay, gradient overlay, pattern overlay, and
stroke. All these blending effects are controlled through the Layer Style dialog box that is accessed via
the Layers palette. Let’s take a look at a few key blending effects now.
1. Create a new file by choosing File New, or press Ctrl+N.
2. In the New dialog box, select 640×480 from the Preset Sizes drop-down and click OK.
3. Click the Create A New Layer button on the bottom edge of the Layers palette.
WARNING You can’t apply blending effects to the Background layer.
4. Press D to set the default colors in the foreground and background color swatches in the tool-
box (black and white).
5. Press B to choose the brush tool. Paint a few soft black brush strokes on the image.
6. Click the Add A Layer Style button on the bottom edge of the Layers palette. A menu appears
(see Figure 1.31) that contains all the blending effects. You will open the same dialog box no
matter which blending effect you choose.
7. Choose Stroke from the menu to open the Layer Style dialog box (see Figure 1.32).