
Page 206 - Mastering SolidWorks
P. 206
|
tUtoRial: applying VisUalization techniqUes 175
Tutorial: Applying Visualization Techniques
Visualization is a key factor when you’re working with SolidWorks software. Whether you are
presenting a design to customers or management, or you are simply checking a design, being
able to see the model in various ways is important. This tutorial guides you through using
several tools and techniques.
1. If the part named Chapter5Sample.sldprt is not already open, open it from the down-
load materials for this chapter. If it is open and changes have been made to it, choose
File ➢ Reload ➢ OK.
2. Practice using some of the controls for rotating and zooming the part. In addition to the
View Toolbar buttons, you should also use Z and Shift+Z (Zoom Out and Zoom In,
respectively), the arrow keys, and the Ctrl+arrow, Shift+arrow, and Alt+arrow
combinations.
3. Use the MMB to select a straight edge on the part, and then drag it with the MMB. This
rotates the part about the selected entity. Also apply this technique when selecting a vertex
and a flat face.
NOTE the technique described in step 3 works only when Rotate about scene Floor is disabled.
4. Select the name of the part at the top of the FeatureManager.
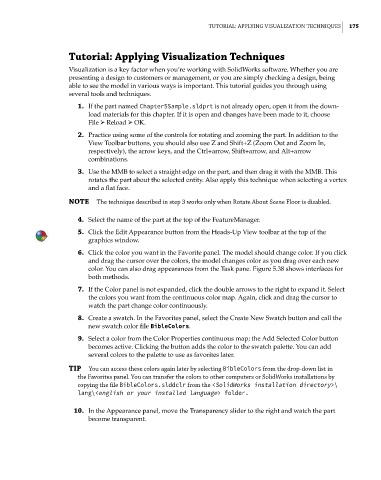
5. Click the Edit Appearance button from the Heads-Up View toolbar at the top of the
graphics window.
6. Click the color you want in the Favorite panel. The model should change color. If you click
and drag the cursor over the colors, the model changes color as you drag over each new
color. You can also drag appearances from the Task pane. Figure 5.38 shows interfaces for
both methods.
7. If the Color panel is not expanded, click the double arrows to the right to expand it. Select
the colors you want from the continuous color map. Again, click and drag the cursor to
watch the part change color continuously.
8. Create a swatch. In the Favorites panel, select the Create New Swatch button and call the
new swatch color file BibleColors.
9. Select a color from the Color Properties continuous map; the Add Selected Color button
becomes active. Clicking the button adds the color to the swatch palette. You can add
several colors to the palette to use as favorites later.
TIP you can access these colors again later by selecting BibleColors from the drop-down list in
the Favorites panel. you can transfer the colors to other computers or solidWorks installations by
copying the file BibleColors.slddclr from the <SolidWorks installation directory>\
lang\<english or your installed language> folder.
10. In the Appearance panel, move the Transparency slider to the right and watch the part
become transparent.