
Page 129 - Subyek Computer Aided Design - [David Planchard] Engineering Design with SOLIDWORKS
P. 129
Engineering Design with SOLIDWORKS® 2018 Fundamentals of Part Modeling
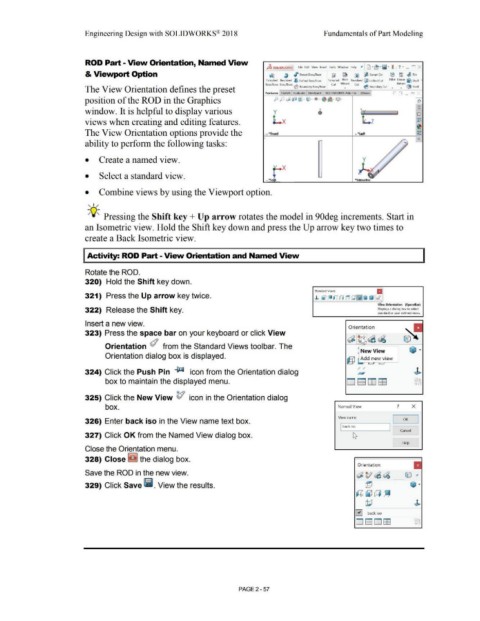
ROD Part - View Orientation, Named View
is SOUDWORl(S File F<lil ViPW lns,,r1 Took Window H@lp 1' 1 · ~ · fijl · ) . ? · _ n X
& Viewport Option QJ ~ ./" Swept Boss/Base [j ~ ~ lj Swept Cut (9 :g ,IJ Rib
Fxl n,df!d Revolved ~ I ofled Ros,/fln<tl Fx1nx1ed Hole RP.volved (jjli t oflecl Cul F.Uet Lmear l)rall •
Boss/Base Boss/Base db Cut Wizard Cut ,e l'att"1n
The View Orientation defines the preset ~ tloundary tloss/llaso • V lloundary lul • • Sholl
Features Sketch Evaluate DimXpert SOUDWORKS Add-Ins 3Dwox ;- "l _ i5l
position of the ROD in the Graphics ;.-.··Jl~1·· ~·t)·~ -·~·c;;::J· -l~
<i
window. It is helpful to display various y (El
views when creating and editing features. Lx Lz ~
~
The View Orientation options provide the ~~~~~~~~~~=--~~~~---r
lii-
• • front
0
• lell
ability to perform the following tasks:
• Create a named view. y
... x
• Select a standard view.
. "To
• Combine views by using the Viewport option.
, ,/
;Q~ Pressing the Shift key + Up arrow rotates the model in 90deg increments. Start in
an Isometric view. Hold the Shift key down and press the Up arrow key two times to
create a Back Isometric view.
Activity: ROD Part - View Orientation and Named View
Rotate the ROD.
320) Hold the Shift key down.
321) Press the Up arrow key twice. :nd; ;"~ (fj ~ ZJ ~ ~ rJ ~
View Orienbttion (Sp•ceBar)
322) Release the Shift key. Displays a dialog box to sel4!ct
standard or user defined views.
Insert a new view.
Orientation
323) Press the space bar on your keyboard or click View
~ [idJ~~
Orientation d from the Standard Views toolbar. The /',._
kNewView ~ ...
Orientation dialog box is displayed.
@ ~ A_d~ ~ew view
-
324) Click the Push Pin ~ icon from the Orientation dialog
box to maintain the displayed menu.
325) Click the New View V icon in the Orientation dialog
box. Named View ? X
View name: I
OK
326) Enter back iso in the View name text box. --- ......._____.
I back iso I
Cancel
327) Click OK from the Named View dialog box.
Help
Close the Orientation menu.
328) Close ~ the dialog box.
Orientation
Save the ROD in the new view.
329) Click Save lii. View the results.
0 back iso
PAGE 2 - 57