
Page 269 - Enhancing CAD Drawings with Photoshop
P. 269
4386.book Page 253 Monday, November 15, 2004 3:27 PM
MAKING ADJUSTMENTS WITH CLIPPING GROUPS 253
Making Adjustments with Clipping Groups
You might remember from Chapter 1 that you can edit adjustment layers in the layer stack (as com-
pared with adjustments). Adjustment layers are preferable because they allow you to try things out
without having to commit to them. You can change your mind later and alter the parameters of an
adjustment layer or throw it away without permanently affecting the pixels of your image.
Normally, adjustment layers affect all the layers below them in the Layers palette. That’s fine if you
want to increase the brightness of many layers at once, for example. Just add a Brightness/Contrast
adjustment layer, and it will affect everything below it in the layer stack.
On the other hand, what if you want the increased flexibility of an adjustment layer, but want to
affect only a single layer? Simple—create a clipping group with the adjustment layer and a masked
layer. Here’s how this works:
1. If you have CompositingProject3.psd open from the previous exercise, you can continue
here; if not, open that file from your hard drive before continuing.
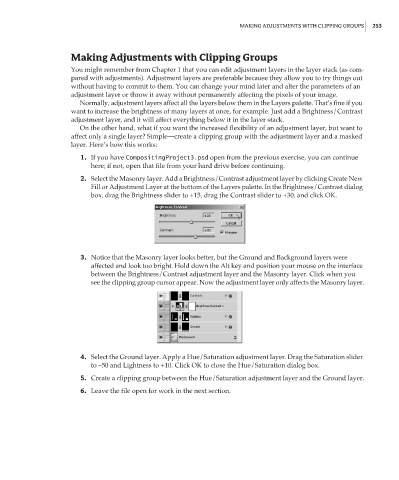
2. Select the Masonry layer. Add a Brightness/Contrast adjustment layer by clicking Create New
Fill or Adjustment Layer at the bottom of the Layers palette. In the Brightness/Contrast dialog
box, drag the Brightness slider to +15, drag the Contrast slider to +30, and click OK.
3. Notice that the Masonry layer looks better, but the Ground and Background layers were
affected and look too bright. Hold down the Alt key and position your mouse on the interface
between the Brightness/Contrast adjustment layer and the Masonry layer. Click when you
see the clipping group cursor appear. Now the adjustment layer only affects the Masonry layer.
4. Select the Ground layer. Apply a Hue/Saturation adjustment layer. Drag the Saturation slider
to –50 and Lightness to +10. Click OK to close the Hue/Saturation dialog box.
5. Create a clipping group between the Hue/Saturation adjustment layer and the Ground layer.
6. Leave the file open for work in the next section.