Page 294 - Handbook of Materials Failure Analysis
P. 294
290    CHAPTER 12 A nonlocal damage-mechanics-based approach


                            From the weld joint of the pipe, SEB specimens were machined. The sketch of the
                         specimen with various dimensions is shown in Figure 12.2a. The proportion of
                         dimensions of the specimen is in accordance to the ASTM E1820-99 standard.
                         The pipe is welded in the circumferential direction. The specimens are machined
                         such that the length of the specimen is in the longitudinal direction of the pipe, thick-
                         ness of the specimen is in the thickness direction of the pipe, and the width of the
                         specimen is in the circumferential direction of the pipe. As the outer diameter of
                         the pipe is 332 mm, machining of a specimen of width 15 mm is easy. The specimen
                         is a single-edge cracked and fatigue pre-cracked beam loaded in three-point bending
                         and supported over a span S. The specimens were micro-etched in order to locate the
                         metallurgically different microstructural zones and to machine initial cracks at the
                         ferrite-buttering and the buttering-weld interface of the welded region of the spec-
                         imen. The notch was initially prepared with saw-cutting and the finish cutting
                         was done by electro-discharge machining. The initial crack size is of 15 mm. Later,
                         fatigue pre-cracking done in the steps of 1 mm upto the crack size of 18 mm.
                            The specimens were 20% side-grooved in order to obtain a plane-strain condition
                         for crack growth during subsequent loading. The crack mouth opening displacement
                         (CMOD) was recorded through a crack opening displacement (COD) gauge which is
                         attached to the data acquisition module of the universal testing machine, while the
                         load was recorded directly from the load cells of the machine. The crack growth dur-
                         ing the test was measured through the standard unloading (i.e., 20% unloading was
                         done) compliance method. The J-integral for the specimens were calculated from the
                         load-displacement data (i.e., using area under load-displacement curve and suitable η
                         and γ factors) following standard ASTM method as described below.
                            The J-integral can be defined as the quantity which represents the rate of energy
                         release with respect to the growing crack surface. According to Sumpter and Turner
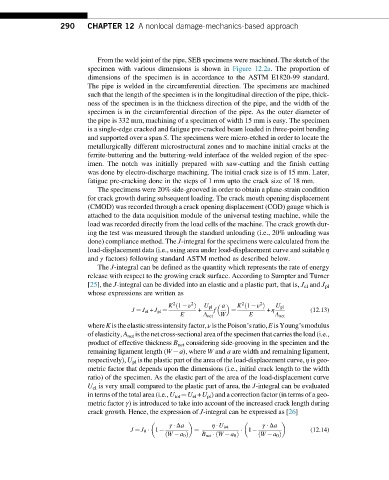
                         [25], the J-integral can be divided into an elastic and a plastic part, that is, J el and J pl
                         whose expressions are written as
                                                 2    2             2    2
                                                              a
                                                                     ð
                                                K 1 ν Þ   U pl      K 1 ν Þ  U pl
                                                  ð
                                      J ¼ J el + J pl ¼  +  f    ¼         + η         (12.13)
                                                   E     A net  W     E      A net
                         whereKistheelasticstressintensityfactor,ν isthePoison’sratio,EisYoung’smodulus
                         of elasticity, A net isthe net cross-sectional areaof the specimenthat carries the load (i.e.,
                         product of effective thickness B net considering side-grooving in the specimen and the
                         remaining ligament length (W a), where W and a are width and remaining ligament,
                         respectively), U pl is the plastic part of the area of the load-displacement curve, η is geo-
                         metric factor that depends upon the dimensions (i.e., initial crack length to the width
                         ratio) of the specimen. As the elastic part of the area of the load-displacement curve
                         U el is very small compared to the plastic part of area, the J-integral can be evaluated
                         in terms of the total area (i.e., U tot ¼U el +U pl ) and a correction factor (in terms of a geo-
                         metric factor γ) is introduced to take into account of the increased crack length during
                         crack growth. Hence, the expression of J-integral can be expressed as [26]

                                                γ   Δa      η   U tot     γ   Δa
                                     J ¼ J 0   1       ¼              1                (12.14)
                                               ð W  a 0 Þ  B net   W  a 0 Þ  ð W  a 0 Þ
                                                             ð

