
Page 74 - The Ultimate Palm Robot
P. 74
Color profile: Generic CMYK printer profile
Composite Default screen
Bots /The Ultimate Palm Robot/ Mukhar & Johnson / 222880-6 / Chapter 3
Chapter 3 Building the Robot 57
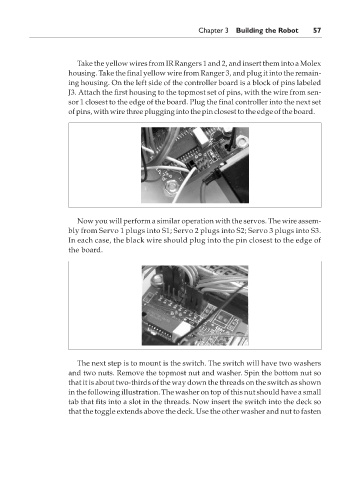
Take the yellow wires from IR Rangers 1 and 2, and insert them into a Molex
housing. Take the final yellow wire from Ranger 3, and plug it into the remain-
ing housing. On the left side of the controller board is a block of pins labeled
J3. Attach the first housing to the topmost set of pins, with the wire from sen-
sor 1 closest to the edge of the board. Plug the final controller into the next set
of pins, with wire three plugging into the pin closest to the edge of the board.
Now you will perform a similar operation with the servos. The wire assem-
bly from Servo 1 plugs into S1; Servo 2 plugs into S2; Servo 3 plugs into S3.
In each case, the black wire should plug into the pin closest to the edge of
the board.
The next step is to mount is the switch. The switch will have two washers
and two nuts. Remove the topmost nut and washer. Spin the bottom nut so
that it is about two-thirds of the way down the threads on the switch as shown
in the following illustration. The washer on top of this nut should have a small
tab that fits into a slot in the threads. Now insert the switch into the deck so
that the toggle extends above the deck. Use the other washer and nut to fasten
P:\010Comp\Bots\880-6\ch03.vp
Monday, May 12, 2003 4:41:20 PM