
Page 548 - Subyek Computer Aided Design - [David Planchard] Engineering Design with SOLIDWORKS
P. 548
Swept, Lofted and Additional Features Engineering Design with SOLIDWORKS® 2018
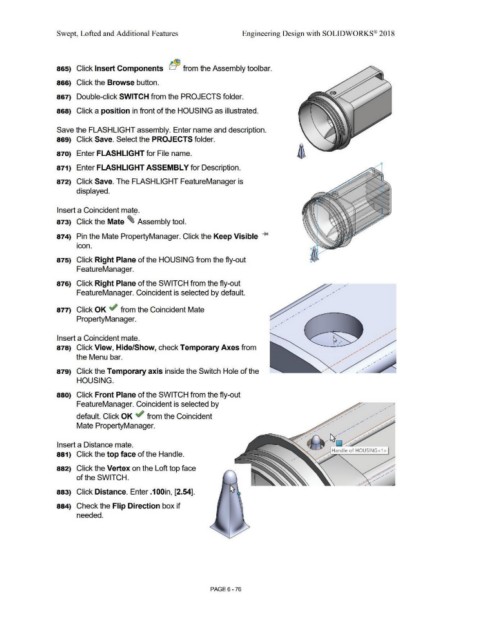
865) Click Insert Components ~~ from the Assembly toolbar.
866) Click the Browse button.
867) Double-click SWITCH from the PROJECTS folder.
868) Click a position in front of the HOUSING as illustrated.
Save the FLASHLIGHT assembly. Enter name and description.
869) Click Save. Select the PROJECTS folder.
870) Enter FLASHLIGHT for File name.
871) Enter FLASHLIGHT ASSEMBLY for Description.
872) Click Save. The FLASHLIGHT FeatureManager is
displayed.
Insert a Coincident mate .
. .
873) Click the Mate ~ Assembly tool.
874) Pin the Mate PropertyManager. Click the Keep Visible ...._
•
icon.
875) Click Right Plane of the HOUSING from the fly-out
FeatureManager.
876) Click Right Plane of the SWITCH from the fly-out
,
,
FeatureManager. Coincident is selected by default.
877) Click OK ./' from the Coincident Mate
PropertyManager.
•
Insert a Coincident mate.
878) Click View, Hide/Show, check Temporary Axes from
the Menu bar.
879) Click the Temporary axis inside the Switch Hole of the
HOUSING.
880) Click Front Plane of the SWITCH from the fly-out
FeatureManager. Coincident is selected by
default. Click OK ~ from the Coincident
Mate PropertyManager.
Insert a Distance mate.
Handle of HOUSING < 1 >
881) Click the top face of the Handle.
882) Click the Vertex on the Loft top face
of the SWITCH.
883) Click Distance. Enter .1 OOin, [2.54].
884) Check the Flip Direction box if
needed.
PAGE 6 - 76