
Page 52 - Enhancing CAD Drawings with Photoshop
P. 52
4386.book Page 35 Monday, November 15, 2004 3:27 PM
PAINTING, ADJUSTING, AND FILTERING 35
9. Choose Image Adjustments Color Balance (or press Ctrl+B). Drag the Yellow/Blue slider
a short distance in the Blue direction to shift the color balance until the corresponding Color
Levels text box reads +70. Click OK.
10. Choose Image Adjustments Brightness/Contrast. Drag the Brightness slider to +30 and
Contrast to –20 and click OK.
Each of the adjustments offers its own specialized set of features that often overlaps with other
adjustment tools. For example, you can adjust color using Hue/Saturation or Color Balance, each in
different ways. Take some time to experiment with some of the other adjustments, and refer to Chap-
ter 3 to see how you can use adjustments in the photo retouching process.
Using Adjustment and Fill Layers
Adjustment layers are different from adjustments in one important respect: they remain editable as
layers, so you can try out adjustments without having to commit to them. You can turn off Adjust-
ment layers or throw them away later if you deem them inappropriate. You can also modify the
parameters of the Adjustment layer if you change your mind later on.
NOTE Adjustment layers affect all the layers below them in the Layers palette. You control which
pixels an Adjustment layer affects by using a mask.
1. Choose File Revert to start over with the Adjustments.psd file.
2. Click the Create New Fill Or Adjustment Layer button at the bottom of the Layers palette.
3. Choose Hue/Saturation from the menu that appears. Drag the Hue slider left to –100, giving
the entire image a violet cast. Click OK.
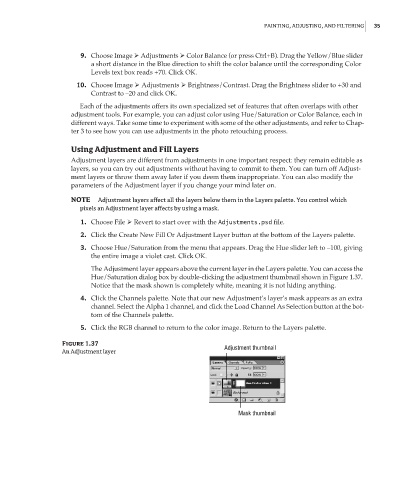
The Adjustment layer appears above the current layer in the Layers palette. You can access the
Hue/Saturation dialog box by double-clicking the adjustment thumbnail shown in Figure 1.37.
Notice that the mask shown is completely white, meaning it is not hiding anything.
4. Click the Channels palette. Note that our new Adjustment’s layer’s mask appears as an extra
channel. Select the Alpha 1 channel, and click the Load Channel As Selection button at the bot-
tom of the Channels palette.
5. Click the RGB channel to return to the color image. Return to the Layers palette.
Figure 1.37
Adjustment thumbnail
An Adjustment layer
Mask thumbnail