Page 374 - Marks Calculation for Machine Design
P. 374
P1: Sanjay
January 4, 2005
Brown˙C08
Brown.cls
356
U.S. Customary 15:14 APPLICATION TO MACHINES SI/Metric
90,000 lb · in 2 259.2N · m 2
τ torsion = τ torsion =
8.95 in 4 3.43 × 10 −6 m 4
= 10,056 lb/in 2 = 75,570,000 N/m 2
= 10.06 kpsi = 75.57 MPa
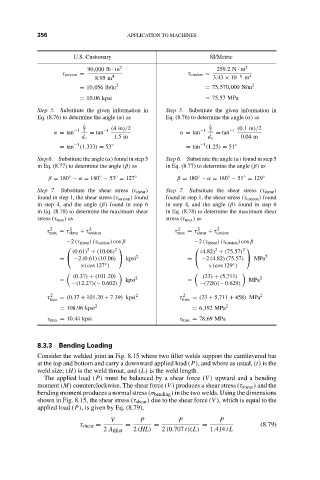
Step 5. Substitute the given information in Step 5. Substitute the given information in
Eq. (8.76) to determine the angle (α) as Eq. (8.76) to determine the angle (α) as
L (4in)/2 L (0.1m)/2
α = tan −1 2 = tan −1 α = tan −1 2 = tan −1
d o 1.5in d o 0.04 m
= tan −1 (1.333) = 53 ◦ = tan −1 (1.25) = 51 ◦
Step 6. Substitute the angle (α) found in step 5 Step 6. Substitute the angle (α) found in step 5
in Eq. (8.77) to determine the angle (β) as in Eq. (8.77) to determine the angle (β) as
◦
◦
◦
◦
◦
◦
β = 180 − α = 180 − 53 = 127 ◦ β = 180 − α = 180 − 51 = 129 ◦
Step 7. Substitute the shear stress (τ shear ) Step 7. Substitute the shear stress (τ shear )
found in step 1, the shear stress (τ torsion ) found found in step 1, the shear stress (τ torsion ) found
in step 4, and the angle (β) found in step 6 in step 4, and the angle (β) found in step 6
in Eq. (8.78) to determine the maximum shear in Eq. (8.78) to determine the maximum shear
stress (τ max ) as stress (τ max ) as
τ 2 = τ 2 + τ 2 τ 2 = τ 2 + τ 2
max shear torsion max shear torsion
−2 (τ shear )(τ torsion ) cos β −2 (τ shear )(τ torsion ) cos β
2 2 2 2
(0.61) + (10.06) (4.82) + (75.57)
= −2 (0.61)(10.06) kpsi 2 = −2 (4.82)(75.57) MPa 2
×(cos 127 ) ×(cos 129 )
◦
◦
(0.37) + (101.20) 2 (23) + (5,711) 2
= kpsi = MPa
−(12.27)(− 0.602) −(728)(− 0.629)
2
2
τ max = (0.37 + 101.20 + 7.39) kpsi 2 τ max = (23 + 5,711 + 458) MPa 2
= 108.96 kpsi 2 = 6,192 MPa 2
τ max = 10.44 kpsi τ max = 78.69 MPa
8.3.3 Bending Loading
Consider the welded joint in Fig. 8.15 where two fillet welds support the cantilevered bar
at the top and bottom and carry a downward applied load (P), and where as usual, (t) is the
weld size, (H) is the weld throat, and (L) is the weld length.
The applied load (P) must be balanced by a shear force (V ) upward and a bending
moment (M) counterclockwise. The shear force (V ) produces a shear stress (τ shear ) and the
bending moment produces a normal stress (σ bending ) in the two welds. Using the dimensions
shown in Fig. 8.15, the shear stress (τ shear ) due to the shear force (V ), which is equal to the
applied load (P), is given by Eq. (8.79),
V P P P
τ shear = = = = (8.79)
2 A fillet 2 (HL) 2 (0.707 t)(L) 1.414 tL

