
Page 217 - Subyek Computer Aided Design - [David Planchard] Engineering Design with SOLIDWORKS
P. 217
Engineering Design with SOLIDWORKS® 2018 Fundamentals of Assembly Modeling
I Activity: Create Socket Head Cap Screw - 4MMCAPSCREW Part
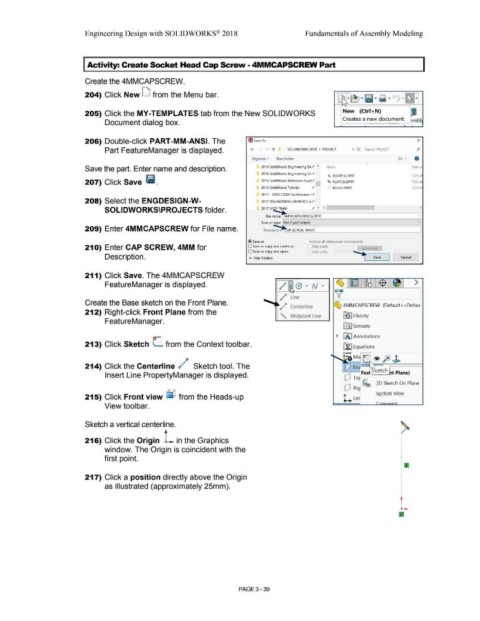
Create the 4MMCAPSCREW.
204) Click New LJ from the Menu bar.
205) Click the MY-TEMPLATES tab from the New SOLIDWORKS New (Ctrl +N)
Creates a new document.
Document dialog box. r--.. -~-.. ·---..
206) Double-click PART-MM-ANSI. The ~ Save As x
Part FeatureManager is displayed. +- v 1' SOLIDWORKS 2018 > PROJECT v C, Search PROJECT J>
•
~ -
Organize • New folder
Save the part. Enter name and description. 2016 SolidWorks Engineering DeJt " Name Date n
2016 SolidWorks Engineering Gr.;t ~ GUIDE.SLDPRT 7/21/2
207) Click Save lfli. 2016 SolidWorks Reference Guidi' ' PLATE.SLDPRT 7/21/2
2016 SolidWorks Tutorial 1' " ROD.SLDPRT 7/21/2
2017 - 2015 CSWA Certification 11'
208) Select the ENGDESIGN-W- 2017 ENGINEERING GRAPHICS w1'
..,, ·-
SOLIDWORKS\PROJECTS folder. 2017 MQP Flioht 1' " < I >
File name: 4MMCAPSCREW.SLDPRT v
Save as type: Part ('.prt;•.sldprt} v
..:.
209) Enter 4MMCAPSCREW for File name. Descriptio~ P SCREW, 4MM I
@Save as Include all referenced components
210) Enter CAP SCREW, 4MM for O Save as copy and continue Add prefix a c c I
.,
O Save as copy and open Add suffix ..,,
Description. " Hide Folders *- Save Cancel
. I
~-~ .
211) Click Save. The 4MMCAPSCREW
FeatureManager is displayed. / · 0 · N · ~ ~~ >
v
/ line
Create the Base sketch on the Front Plane.
rf.,P Centerline ~ 4MMCAPSCREW (Default< <Defau
212) Right-click Front Plane from the
"'- Midpoint line [€> J History
FeatureManager.
[(1 J Sensors
~ [A] Annotations
213) Click Sketch [_ from the Context toolbar.
p
214) Click the Centerline i1## Sketch tool. The : Fr
'
---Fea ketch t Plane)
Insert Line PropertyManager is displayed. cP Tori-
r?.1 ~D Sketch On Plane
[fJ Ri ~ D
Section View
215) Click Front view ~ from the Heads-up t. Ori
View toolbar.
Sketch a vertical centerline. ~
....
216) Click the Origin L in the Graphics
window. The Origin is coincident with the
first point.
217) Click a position directly above the Origin
as illustrated (approximately 25mm).
L
PAGE 3-39