Page 496 - Subyek Computer Aided Design - [David Planchard] Engineering Design with SOLIDWORKS
P. 496

Swept, Lofted and Additional Features                                                                                                                      Engineering Design with SOLIDWORKS® 2018


                                                Insert a Revolved Cut feature.


                                                                                                                                                                                                                                                                                                      ~
                                                                                                                                                                                                                                                                                   ~  ~                       $         ~
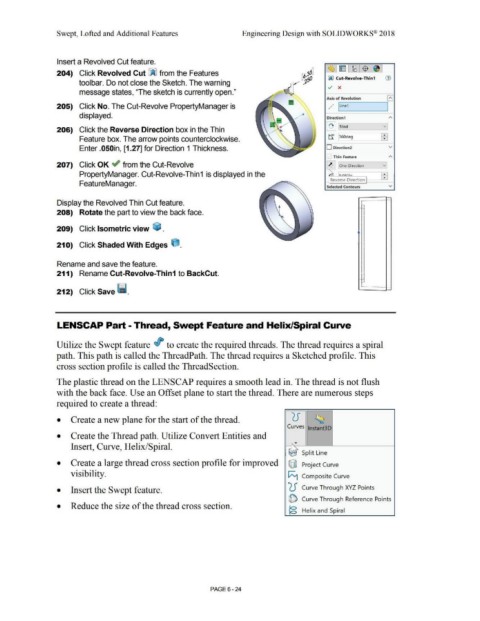
                                                204)  Click Revolved Cut ~ from the Features


                                                                                                                                                                                                                                                                                   00  Cut-Revolve-Thin1                          (1)
                                                                   toolbar. Do not close the Sketch. The warning

                                                                                                                                                                                                                                                                                  ./  x
                                                                   message states, "The sketch is currently open."


                                                                                                                                                                                                                                                                                 Axis of Revolution                                 6
                                                                                                                                                                                                                                                                                      .,
                                                205)  Click No. The Cut-Revolve PropertyManager is                                                                                                                                                                                 ,.      lline1                                   I
                                                                                                                                                                                                                                                                                     /

                                                                   displayed.                                                                                                                                                                                                     Direction1                                         "'


                                                                                                                                                                                                                                                                                                                                 v:

                                                206)  Click the Reverse Direction box in the Thin                                                                                                                                                                                I~ I 1Blind


                                                                   Feature box. The arrow points counterclockwise.                                                                                                                                                                 tl      [360deg                            ill


                                                                   Enter .050in, [1.27] for Direction 1 Thickness.                                                                                                                                                               D Direction2                                        v


                                                                                                                                                                                                                                                                                       Thin Feature                                  "'

                                                207)  Click OK ~ from the Cut-Revolve                                                                                                                                                                                              ~       I One-Direction                      vi


                                                                   PropertyManager. Cut-Revolve-Thin1  is displayed in the                                                                                                                                                          ~ rn --n·-                                 - •


                                                                                                                                                                                                                                                                                    Reverse Direction                            •
                                                                   FeatureManager.
                                                                                                                                                                                                                                                                                  Selected Contours                                  v


                                                                                                                                                                                                                                                                                                              r.... . . . . . . . . . . . . . . . .
                                                Display the Revolved Thin Cut feature.                                                                                                                                                                                                                         . ,

                                                                                                                                                                                                                                                                                                             . · 1
                                                208)  Rotate the part to view the back face.


                                                209)  Click Isometric view  ~ .


                                                210)  Click Shaded With Edges e.


                                                Rename and save the feature.


                                                211)  Rename Cut-Revolve-Thin1 to BackCut.
                                                                                                                                                                                                                                                                                                             . .l j


                                                                                                                                                                                                                                                                                                              I· J
                                                212)  Click Save ii.                                                                                                                                                                                                                                          ~------------------ ..


                                                LENSCAP Part - Thread, Swept Feature and Helix/Spiral Curve


                                                Utilize the Swept feature If to create the required threads. The thread requires a spiral


                                                path. This path is called the ThreadPath. The thread requires a Sketched profile. This


                                                cross section profile is called the ThreadSection.


                                                The plastic thread on the LENSCAP requires a smooth lead in. The thread is not flush


                                                with the back face. Use an Offset plane to start the thread. There are numerous steps


                                                required to create a thread:


                                                •           Create a new plane for the start of the thread .                                                                                                                                        cf                 ~


                                                                                                                                                                                                                                                 Curves  lnstant3D

                                                •           Create the Thread path. Utilize Convert Entities and


                                                            Insert, Curve, Helix/Spiral.                                                                                                                                                               '

                                                                                                                                                                                                                                                       1
                                                                                                                                                                                                                                                  E/\ ~  Split  Line


                                                •           Create a large thread cross section profile for improved                                                                                                                              @  Project Curve


                                                            visibility.                                                                                                                                                                          ~ Composite Curve


                                                •           Insert the Swept feature .                                                                                                                                                           °2J  Curve Through XYZ Points


                                                                                                                                                                                                                                                 [fb  Curve Through Reference Points

                                                •           Reduce the size of the thread cross section .                                                                                                                                         ~ Helix and Spiral


                                                                                                                                                                                PAGE 6 - 24
   491   492   493   494   495   496   497   498   499   500   501