Page 498 - Subyek Computer Aided Design - [David Planchard] Engineering Design with SOLIDWORKS
P. 498
Swept, Lofted and Additional Features Engineering Design with SOLIDWORKS® 2018
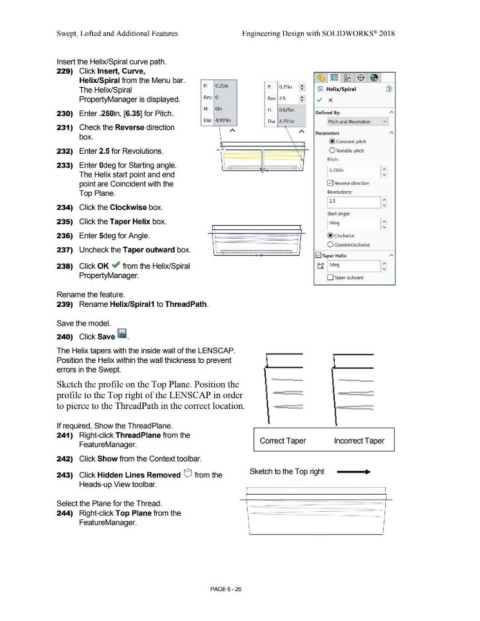
Insert the Helix/Spiral curve path.
229) Click Insert, Curve,
[t8
Helix/Spiral from the Menu bar. ~ ~ $ ,~
P: 0.25in P: 0.25in
The Helix/Spiral ~ jg Helix/Spiral CT)
PropertyManager is displayed. Rev: 0 Rev: 2.5 ~ v x
H: Oin H: 0.625in
230) Enter .250in, [6.35] for Pitch. Defined By: A
Dia: 4.901 in Dia: 4.791 in Pitch and Revolution v
231) Check the Reverse direction -
A A Parameters A
box. \
.
• \ • @constant pitch
•
•
232) Enter 2.5 for Revolutions. - - - - \ • O Variable pitch
"
• 'q
•
. Pitch:
•
.
•
....
•
233) Enter Odeg for Starting angle. • • ·-· --, .. -- - ~ .
•
-
•
·-
•
•
The Helix start point and end I 0.250in 1:
point are Coincident with the lvJ Reverse direction
Top Plane. Revolutions:
[ 2.5 1:
234) Click the Clockwise box.
Start angle:
235) Click the Taper Helix box. [ Odeg 1:
• •
•
•
• •
236) Enter 5deg for Angle. • • @clockwise
•
• •
• •
• •
• • O Counterclockwise
• •
•
•
-
237) Uncheck the Taper outward box. • --- -----··--- --~ •
-~-
.
•
-
•
...
•
•
0 Taper Helix A
238) Click OK ~ from the Helix/Spiral tf [ Sdeg 1:
PropertyManager. D Taper outward
Rename the feature.
239) Rename Helix/Spiral1 to ThreadPath.
Save the model.
240) Click Save ii.
The Helix tapers with the inside wall of the LENSCAP.
Position the Helix within the wall thickness to prevent
errors in the Swept.
Sketch the profile on the Top Plane. Position the
profile to the Top right of the LENSCAP in order
to pierce to the ThreadPath in the correct location.
If required, Show the ThreadPlane.
241) Right-click Thread Plane from the
Correct Taper Incorrect Taper
FeatureManager.
242) Click Show from the Context toolbar.
Sketch to the Top right
243) Click Hidden Lines Removed GJ from the
Heads-up View toolbar.
Select the Plane for the Thread.
244) Right-click Top Plane from the
FeatureManager.
PAGE 6 - 26

